Showing posts with label Papercrafting. Show all posts

Wednesday, June 4, 2025

Decorative Envelopes DIY

Red and gold are not my colors but the warm theme of this decorative Dragonfly Envelope Stationery Set is gorgeous! Years ago, I had greatly admired a mixed media piece in luscious reds and golds at a Thrift store in Georgia. I went back to get it a few days later, thinking that surely no one would want it. Sadly, it was gone. 

That experience inspired me to choose a similar color theme for this project. It started as a mis-printed piece of lightweight cardstock destined for the round file. I used my  We R Memory Keepers Envelope Punch Board to create an envelope.


Most of the print ended up on the backside. 


To make a more neutral background to work on, I lightly sponged white acrylic paint over the print. Leaving some showing enhanced the design.


I began stamping using background and small stamps. 


The #90246 Dragonflies stamp is from Stamps Happen, Inc (could not find a website, shared Etsy search), licensed by Carolyn Shores Wright.  


The Primulars Postcard #3721H stamp is from Rubber Stampede (could not find a website, shared Etsy search), licensed by Sarah Lugg.


The Dragonfly Background #RS4756 stamp is from Hampton Art (sold in 2007 to National Spinning in North Carolina, shared FB page), licensed by Judy Melvin. The clock stamp is one of my eraser, hand-carved stamps.


I bought the wooden floral, round rubber stamps from Aliexpress in a set of 6. 

The Wish Postmark #554E stamp is from All Night Media, Inc., (could not find a website, shared Etsy search).


Because I used light colored stamping inks (my Whispers vintage set, shared Ebay search), I lightly outlined some of the stamped images with black ink. I glued on some red seed beads. 

I began working on the clips. I tied a bow from a scrap of red grosgrain ribbon and painted on gold glitter glue. I also painted the glitter on the top of a clothespin and lightly brushed the sides with red paint.


I painted and embellished 2 love words printed foam hearts elements for the paperclip accessory and added flat rhinestones to the clothespin.

I began to color my design with chalk pastels, using mostly red, gold and peach. I accented with a gold glitter gel pen. I like the pastel set that I bought from Hobby Lobby. It is from Loew Cornell and has 48 nice-sized sticks in a great range of colors.  


I embellished with pressed flowers and flat, acrylic rhinestones. The postage stamp is made with a bead soup glued into the rectangle space.


I sealed the pastel design with spray fixative. I applied glue to the backsides of the foam hearts and sandwiched the paperclip and some silk flower petals between them. I clipped it to dry.


I traced the envelope flap onto a piece of red craft paper, cut out and added for an envelope liner.


The envelope closure is made with a hook and loop dot.


I dry-brushed a bronze, coin charm with a metallic gold paint pen. I embellished the envelope flap with the bow. I attached bead dangles and the coin charm with a jump ring through a punched hole in the flap.


I finished the clips by adding glitter paint, beads, sequins and flat rhinestones. brushing with Mod-Podge to seal. The paperclip has a different design on each side.


This sweet little decorative envelope set could add a garden ambience to a sunroom table or enhance a foyer console display. It could decorate a cabinet or shelf vignette. It could even be used as craft studio decor and do double duty as papercrafting storage.

The next time you want to toss out a mis-printed sheet or a damaged envelope, salvage and alter it. They also make nice gifts ribbon-tied in 3's. But watch who you give them to. Some people don't know what these types of artsy gifts are for. 😄

______________________________

Order a mini hearts envelopes printable from Love Romance Marriage. Use them in collage, altered art and journal making. Use to store tiny stamps and ephemera. Use as thank-you notes.


Monday, December 2, 2024

Cyber Monday Sale Through Friday 12/2/24


Cyber Monday Sale

25% Off Entire Love Romance Marriage Shop

DIY Wedding Planning Pkgs

Printable Wall Art, Papers, Collage Sheets, Envelopes, Tags and more! 

Love Romance Marriage


Wednesday, July 24, 2024

Purple Hearts Background, Hearts Scrapbook Paper


3 abstract hand painted hearts printable paper designs.

Personal and commercial use printable paper at Love Romance Marriage

You receive 3 JPEGS + Graphics Agreement JPEG

 <><><><><><><><><><>


REGARDING ONLINE THEFT OF MY WORK


I have not given permission for other shops, websites, crafters or designers to sell my products or designs. If you see my printables and digitals being sold other than through Love Romance Marriage, Artsy Craftery Design Studio or Printaphoria website, if it is not noted as a collaboration, it is possible that they have been stolen. Feel free to alert me and thank you!


<><><><><><><><><><>

Love Romance Marriage, Forever Romantic & Printaphoria are brands of ©Artsy Craftery Design Studio | All Rights Reserved


Tuesday, August 15, 2023

Patchwork Bottles: A Dramatic Decor Craft


I had thrown so many bottles away that I put my foot down and declared I'm going to find a quick, decorative technique so that I can salvage these bottles!
 
I like working with glass because of its sparkling transparency. Even when covered up, as I've done with these bottles, it's still exciting to feel the heftiness of the glass in my hands.

Ways to decorate a bottle.
I decided on a freeform, patchwork design. Before I chose my papers, I decided on color schemes of:
  • whites/creams/silvers for the 1st bottle,
  • pinks/mauves/fuchsias for the 2nd,
  • and golds/silvers/cremes/whites for the 3rd.
I tore up a supply of various papers, keeping them close to similar sizes by layering them before tearing. It was easy to apply glue to each piece and stick it to the bottle. The challenge was choosing each piece so that the same designs and colors were not bunched up together.

Since paper crafting is my first love, I have a huge stock of scrap papers that makes it easy to arrange color schemes. I loved using foils/metallics. Some of them, especially the fuchsias, are actually salvaged candy/gum wrappers! I scavenge papers from anywhere and anything. Metallic papers can be pulled from the envelope liners of greeting cards that we receive.


Deciding in what design to place the papers can be challenging and a reason for procrastination. I decided that for every 5 papers that I glued down I would place one of the darkest colors.

Another thing that helps with your pattern design is that you don’t have to glue in a certain direction. Each piece of paper can be glued up, down, left or right in line with what was placed last. This gives a lot of leeway in balancing the colors and sizes in the placement of the paper pieces.


I started at the bottom gluing papers and worked my way around and up to the top of each bottle. Once finished, I painted each bottle with a matte sealer. You can use a matte or gloss medium, one of the Modge Podge or Decorart brands of sealers or white PVC glue. It depends on how durable you want your bottles to be and where you plan to display them. Outside or in moist areas will require a sealer that can protect against that.


I decided to add another fav medium, craft wire, to the largest bottle. It’s really easy. Most important is not to cut a length of wire first. Just wrap and twist with a pliers, wrap and twist while unwinding the wire from the roll.

You then won’t end up with a too short piece or extra that you have to clip off and store. If you precut a piece and it runs short, you could easily join another piece and twist carefully to hide the join.

I chose a golden wire and twisted a design with wire pliers, making sure to add a twist each time the wire passed each side of the bottle. When I finished, I crimped each end of the wire back onto itself, hiding the ends and securing them.

I painted and embellished a wooden ball for the top of one bottle, attaching it securely with tacky glue.

I kept the black, plastic, twist-on cap on the silvery bottle, decoupaging it with silver paper. I then formed a sculptural design on top of that cap with another piece of the silver paper drenched in glue.
I really like my design of the cork stopper for the gold and silver bottle. I painted it white and added a spiral design with a metallic gold paint pen.


I securely glued it into the top of the bottle with tacky glue. I had decoupaged gold metallic, textured paper around and into the bottle opening. This helped to secure the cork inside.
 

I created a sculptural topper for the bottle cork out of reclaimed metal, wire and beads. The metal disk had a metal post on it (it was part of an old pierced earring), which I stuck into a glue-filled hole in the cork.

Paper patchwork.
I like my work to be finished on all surfaces, so I cut and glued coordinated craft felt to the bottom of each bottle. It helps keep them from sliding off of shelves and protects surfaces.

Bottle decoration ideas.
The most time-consuming part of this technique is, of course, designing the paper patchwork design. Once you get started it goes very quickly.


I like looking at these bottles. They dress up any table or shelf with a pretty flash of creativity. Get busy!

Make your creative flash today!


Wednesday, August 2, 2023

Happy Creative Wednesday & Easy Nature Crafts

Creativity is a part of everyday life for those who love making, designing, writing and photography. See my tissue paper leaves glued to natural twigs? That's easy creativity that you can do. 

Fold several layers of tissue paper and cut out oval/marquis/cat eye shapes. Fold them over twigs and glue. Liquid glue works best. Glue sticks may tear the tissue paper. Place your leafy stems in a vase and decorate your environment with this lovely, nature crafts floral design.  

So many possibilities with color schemes and twigs formations! Easy weekend crafts projects for you! Easy crafts for kids!

Happy Creative Wednesday!

*****


Thursday, April 14, 2022

Hot Pink Digital Papers

I have so much fun coordinating patterned papers that I curate from my designs stock. This is a good way for you to try out some of my paper and digital patterns. You can then buy the trio pks and other single colorways of those that you like. 

Click Buy Now below or visit Printaphoria Shop for more Trio Paper Pks.

...


Thursday, December 23, 2021

Die-Cut, Stamped, Embossed Christmas Cards Technique

I designed these narrow Christmas cards, 3.25 x 6", to fit lavender envelopes that I already had. Techniques and media used are stamping, dry/heat embossing, die-cutting, embossing folders, cardstock, ink, glitter, embossing powder, Washi tape, ribbon trim, rhinestones, gel and paint pens and gel plate-printed background papers.

I die-cut the Christmas trees and snowflakes shapes with dies in 2 sizes/designs from Aliexpress. I like these trees because they have nice cut-out designs in the branches. 
 
After trimming my gel plate-printed papers, I dry-embossed them with an Aliexpress snowflakes embossing folder. I highlighted some of the dry embossed snowflakes with silver metallic gel and paint pens.
 
Joy Peace Love is stamped/embossed with a sentiment stamp from an Aliexpress holiday set. I refreshed my Stampabilities embossing ink pad with a few drops of glycerin spread across the top and lightly pressed in with a spoon. It has lasted well over 2 years. You can get a bottle of glycerin at most drug stores or the pharmacy of discount stores.
 
The heat embossing of the stamped text was done with Ranger Snowflake Embossing Tinsel (a combo of white embossing powder and silver glitter) and Joann Craft Essentials Silver. I kiss-trimmed each sentiment.
 
I stamped inside sentiments of Merry Christmas and a Joy To The World wreath, with the same Aliexpress holiday set, with Memento Tuxedo Black. You can see part of these sentiments in image #2, where I off-stamped on little pieces of card stock.
 

I adhered Washi tape from Amazon and Aliexpress and mini ribbon trim to the embossed panels and glued them to the folded, white cardstock. After I attached the snowflakes and trees, I positioned the Joy Peace Love sentiments and glued on. 
 
I embellished each card with glitters and rhinestones from various sources.
 
I stamped my logo on back with a Zazzle customized stamp in My Favorite Things Boysenberry.
 
These multi-technique holiday cards came out very well to be a rushed job. Next year, I'm going to start earlier, I always say!
 
Merry Christmas! Joy, Peace & Love To You & Yours!
 
Note: Products without links means I couldn't find them or I don't remember where I got them.


Wednesday, December 22, 2021

Double-Embossing Technique On Star Of Jesus Cards


Ran across these lovely, Star of Jesus cards in my Gelatin Printing Enthusiasts Facebook group. I wondered if they were embossed but thought the stars looked thicker than expected. Did the crafter use some type of ultra or super thick embossing powder or enamel?

It turns out that crafter, Michelle Moussan, used the easy double-embossing technique. She explains below:

I die cut the star and then did the double embossing. After I melt the first layer of embossing powder, I ink it again with embossing ink and add a second layer of embossing powder. I then added small bits of highly reflective glitter. Like I said just a bit so it wouldn’t be overwhelming just catch the light a little. 


Embossed Cards Design by Michelle Moussan

The double-embossed effect can work with what we have, rather than buying another product, such as ultra thick embossing powder. Just a few minutes more are needed to get the look. Designs can even be embossed a third time. 

It would seem that generally, the thicker the embossing will be, the less intricate the design will need to be. Heavy embossing may over fill detailed areas.


Thursday, April 15, 2021

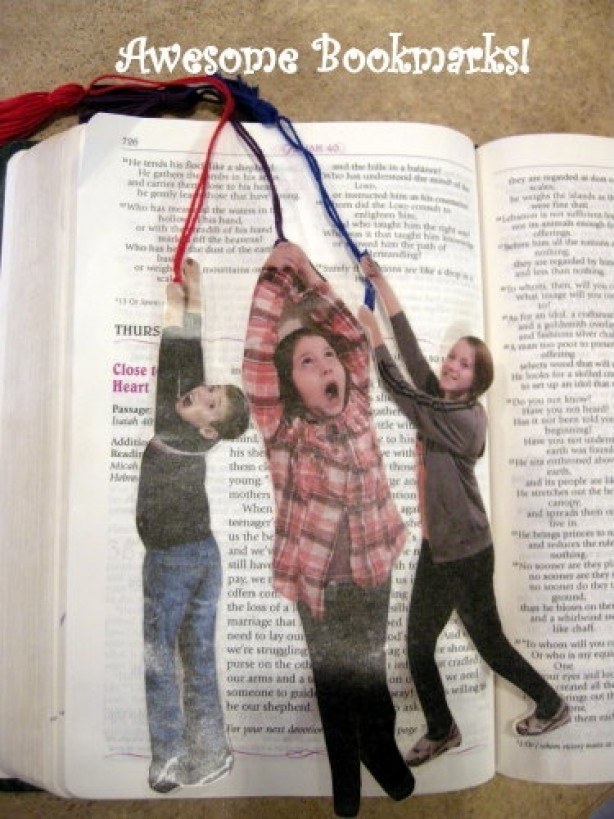
Make Bookmarks Of Your Family

Buzzfeed Craft Project

I have never seen bookmarks like this before! Opening your book and seeing your most favorite person would be SO much fun! Wonderful gift idea for parents and grandparents. Easier than I thought to make them too. Find this nifty project and others at

 
Happy Crafting!